Difference between revisions of "The Alberian Front/Lunatic"
Jump to navigation
Jump to search

 The Alberian Front (Lunatic)
 Wyrmite x5
>Seraii (Created page with "{{QuestDisplay |QuestType=Defensive |Id=214010303 |QuestGroupName=The Alberian Front |GroupType=Event |EventName=Fire Emblem: Lost Heroes |SectionName=(Co-op Recommended) |Loc...") |
>Boblers (noting house buffs) |
||
| (35 intermediate revisions by 6 users not shown) | |||
| Line 12: | Line 12: | ||
|PreviousQuest=The Alberian Front (Hard) | |PreviousQuest=The Alberian Front (Hard) | ||
|Elemental=None | |Elemental=None | ||
| − | |SuggestedMight= | + | |SuggestedMight= |
| − | |MightRequirement= | + | |MightRequirement=16000 |
|FixedStats= | |FixedStats= | ||
|NormalStaminaCost=20 | |NormalStaminaCost=20 | ||
| Line 22: | Line 22: | ||
|TimeLimit=600 | |TimeLimit=600 | ||
|ContinueLimit=0 | |ContinueLimit=0 | ||
| + | |RebornLimit=0 | ||
|ThumbnailImage=Quest_List_Thumbnail_12 | |ThumbnailImage=Quest_List_Thumbnail_12 | ||
|MissionCompleteType1=Don't allow any of your team to fall in battle | |MissionCompleteType1=Don't allow any of your team to fall in battle | ||
|MissionCompleteType2=Allow no more than 2 of your team to fall in battle | |MissionCompleteType2=Allow no more than 2 of your team to fall in battle | ||
| − | |MissionCompleteType3=Don't use any | + | |MissionCompleteType3=Don't use any revives |
|MissionsClearSetEntityType1=Wyrmite | |MissionsClearSetEntityType1=Wyrmite | ||
|MissionsClearSetEntityQuantity1=5 | |MissionsClearSetEntityQuantity1=5 | ||
| Line 37: | Line 38: | ||
|DefensiveClearReward=Valor | |DefensiveClearReward=Valor | ||
|DefensiveClearRewardType=Material | |DefensiveClearRewardType=Material | ||
| − | |DefensiveClearRewardQuantity= | + | |DefensiveClearRewardQuantity=4000 |
|DefensiveConditions= | |DefensiveConditions= | ||
| + | {{DefensiveConditionRow|Don't allow any of your team to fall in battle|10}} | ||
| + | {{DefensiveConditionRow|Allow no more than 1 of your team to fall in battle|10}} | ||
| + | {{DefensiveConditionRow|Allow no more than 2 of your team to fall in battle|10}} | ||
| + | {{DefensiveConditionRow|Shapeshift 1 or more times within your team|10}} | ||
| + | {{DefensiveConditionRow|Defeat the Imperial Commander|20}} | ||
| + | {{DefensiveConditionRow|Defeat the Shadow Knight|300}} | ||
| + | {{DefensiveConditionRow|Save 1 house(s)|10}} | ||
| + | {{DefensiveConditionRow|Save 2 house(s)|10}} | ||
| + | {{DefensiveConditionRow|Save 3 house(s)|20}} | ||
| + | {{DefensiveConditionRow|Finish with the gate's HP at or above 30%|10}} | ||
| + | {{DefensiveConditionRow|Finish with the gate's HP at or above 50%|50}} | ||
| + | {{DefensiveConditionRow|Finish with the gate's HP at or above 100%|100}} | ||
| + | {{DefensiveConditionRow|Finish in 210 or more seconds remaining|20}} | ||
| + | {{DefensiveConditionRow|Finish in 270 or more seconds remaining|50}} | ||
| + | {{DefensiveConditionRow|Finish in 360 or more seconds remaining|100}} | ||
| + | {{DefensiveConditionRow|Lower 1 or more drawbridges|10}} | ||
| + | |DefensiveMapImageName=Lost Heroes Lunatic | ||
|FirstClearRewards= | |FirstClearRewards= | ||
{{DropReward|droptype=First|itemtype=Currency|item=Wyrmite|exact=5}} | {{DropReward|droptype=First|itemtype=Currency|item=Wyrmite|exact=5}} | ||
|DropRewards= | |DropRewards= | ||
| + | {{DropReward|droptype=Common|itemtype=Material|item=Badge}} | ||
| + | {{DropReward|droptype=Common|itemtype=Material|item=Great Badge}} | ||
| + | {{DropReward|droptype=Common|itemtype=Material|item=Bronze Crystal}} | ||
| + | {{DropReward|droptype=Common|itemtype=Material|item=Bronze Whetstone}} | ||
| + | {{DropReward|droptype=Common|itemtype=Material|item=Holy Water}} | ||
| + | {{DropReward|droptype=Common|itemtype=Material|item=Gold Whetstone}} | ||
| + | {{DropReward|droptype=Common|itemtype=Material|item=Consecrated Water}} | ||
| + | {{DropReward|droptype=Common|itemtype=Material|item=Blaze Orb}} | ||
| + | {{DropReward|droptype=Common|itemtype=Material|item=Stream Orb}} | ||
| + | {{DropReward|droptype=Common|itemtype=Material|item=Storm Orb}} | ||
| + | {{DropReward|droptype=Common|itemtype=Material|item=Radiance Orb}} | ||
| + | {{DropReward|droptype=Common|itemtype=Material|item=Nightfall Orb}} | ||
| + | {{DropReward|droptype=Common|itemtype=Material|item=Damascus Crystal}} | ||
| + | {{DropReward|droptype=Common|itemtype=Material|item=Golden Fragment}} | ||
| + | {{DropReward|droptype=Common|itemtype=Material|item=Twinkling Grains}} | ||
|WeaponRewards= | |WeaponRewards= | ||
|WyrmprintRewards= | |WyrmprintRewards= | ||
| Line 49: | Line 82: | ||
|WeeklyDropReward= | |WeeklyDropReward= | ||
|ShowEnemies=1 | |ShowEnemies=1 | ||
| + | |Notes= | ||
| + | * The [[Shadow Knight]] will spawn if all waves are cleared within 210 seconds (6:30 remaining). | ||
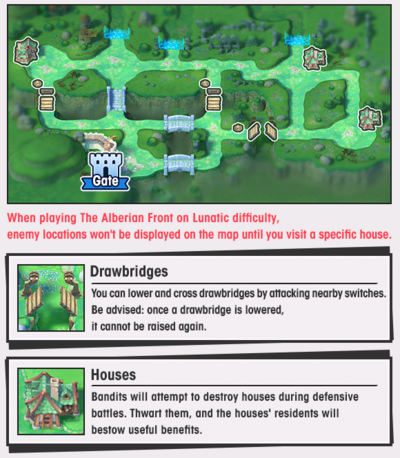
| + | * Rescuing the houses will each grant a buff that lasts for the remainder of the quest: | ||
| + | ** left-most house: 20% defense | ||
| + | ** bottom-right house: visibility of enemies on mini-map | ||
| + | ** top-right house: 15% strength | ||
}} | }} | ||
Latest revision as of 00:31, 10 May 2020
Defensive Event: Fire Emblem: Lost Heroes
The Alberian Front (Lunatic)(Co-op Recommended)
Previous Quest
Stamina Cost: 20
Getherwing Cost: 
Required Might: 16000
Details
- Victory: Protect the gate
- Defeat: The gate is destroyed
- Continues Available: 0
- Revives Available: 0
Endeavor Rewards
| Condition | Reward |
|---|---|
 Don't allow any of your team to fall in battle Don't allow any of your team to fall in battle
|
 Wyrmite x 5 Wyrmite x 5
|
| Allow no more than 2 of your team to fall in battle
|
Wyrmite x 5
|
| Don't use any revives
|
Wyrmite x 5
|
| All Endeavors Completed
|
Wyrmite x 5
|
Defensive Event Rewards
- Base Reward - Stage Clear: Error: Table Materials not found.x4000
| Condition | Multiplier |
|---|---|
| Don't allow any of your team to fall in battle | 10% |
| Allow no more than 1 of your team to fall in battle | 10% |
| Allow no more than 2 of your team to fall in battle | 10% |
| Shapeshift 1 or more times within your team | 10% |
| Defeat the Imperial Commander | 20% |
| Defeat the Shadow Knight | 300% |
| Save 1 house(s) | 10% |
| Save 2 house(s) | 10% |
| Save 3 house(s) | 20% |
| Finish with the gate's HP at or above 30% | 10% |
| Finish with the gate's HP at or above 50% | 50% |
| Finish with the gate's HP at or above 100% | 100% |
| Finish in 210 or more seconds remaining | 20% |
| Finish in 270 or more seconds remaining | 50% |
| Finish in 360 or more seconds remaining | 100% |
| Lower 1 or more drawbridges | 10% |
First Clear Rewards
Wyrmite x5Material Drop Rewards
Error: Table Materials not found.
Error: Table Materials not found.
Error: Table Materials not found.
Error: Table Materials not found.
Error: Table Materials not found.
Error: Table Materials not found.
Error: Table Materials not found.
Error: Table Materials not found.
Error: Table Materials not found.
Error: Table Materials not found.
Error: Table Materials not found.
Error: Table Materials not found.
Error: Table Materials not found.
Error: Table Materials not found.
Error: Table Materials not found.
Enemies
Error: Table EnemiesTest not found.
Notes
- The Shadow Knight will spawn if all waves are cleared within 210 seconds (6:30 remaining).
- Rescuing the houses will each grant a buff that lasts for the remainder of the quest:
- left-most house: 20% defense
- bottom-right house: visibility of enemies on mini-map
- top-right house: 15% strength